ブラウザでYOLOを使用し物体検出、OBB(回転のある物体検出)、セグメンテーション、姿勢推定の4つの検出を実行する手順のメモ
YOLO v12でAttensionを取り入れたということで試していたところNMSを含めたモデルをexportができるようになっていたので新しくこのメモを作成しました。
デモサイト
https://yu2728.github.io/ObjectDetectionInBrowser/
github
https://github.com/yu2728/ObjectDetectionInBrowser
ultralytics 8.3.90
物体検出/OBB/セグメンテーション/姿勢推定について
はじめに各手法がどういう情報を得られるか簡単に説明しておきます。
物体検出
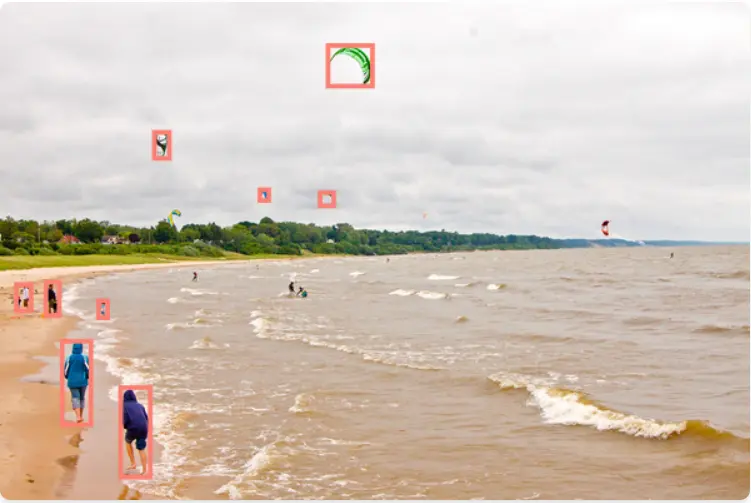
おそらく一番使われるだろう物体検出です。以下の画像のように特定の物体を識別し、その位置を矩形(バウンディングボックス)で得られる。
OBB
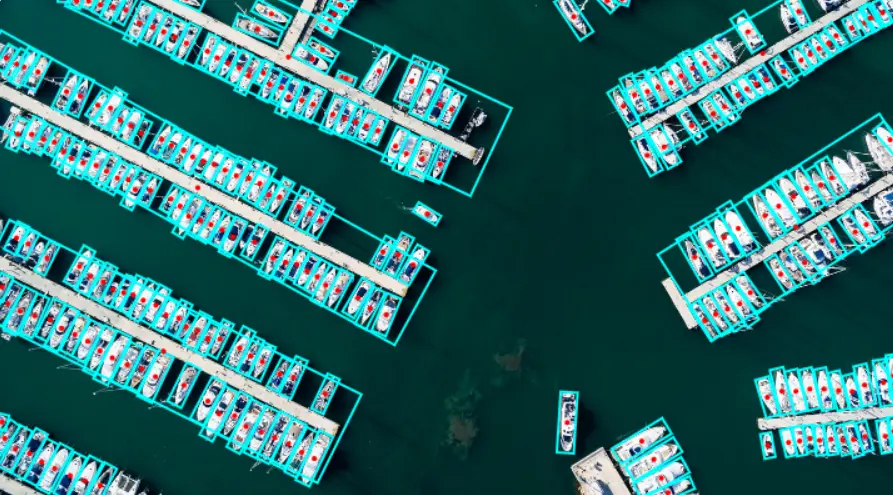
物体検出に回転を足して、傾いた矩形を得られます。
セグメンテーション
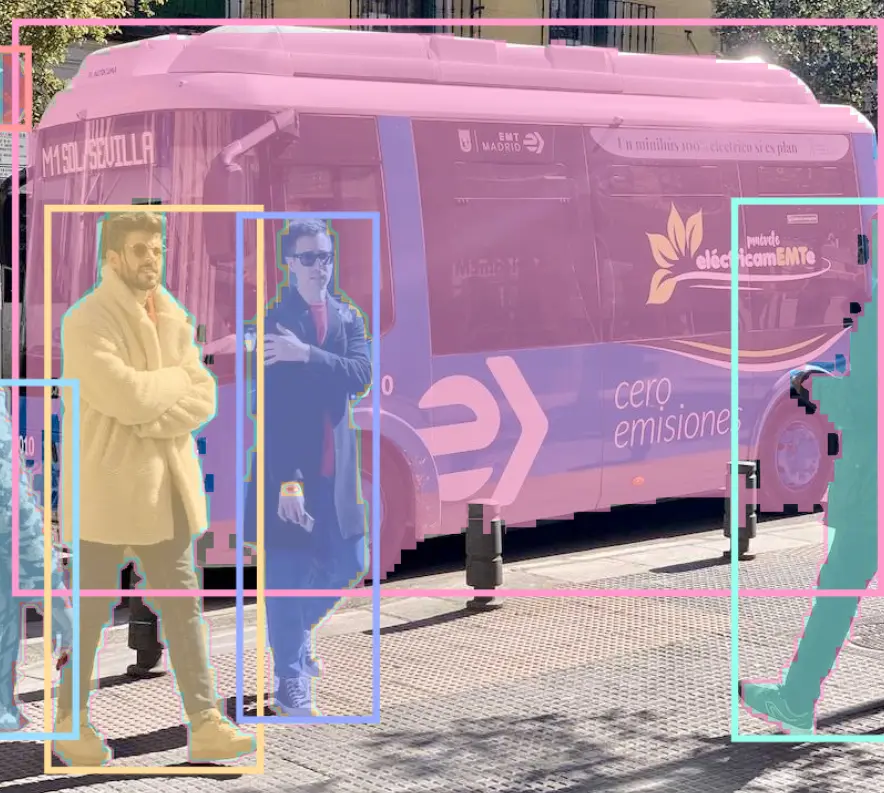
物体検出が「四角い枠」で対象を囲むのに対し、セグメンテーションは ピクセル単位で物体の領域を特定するデータが得られます。
姿勢推定
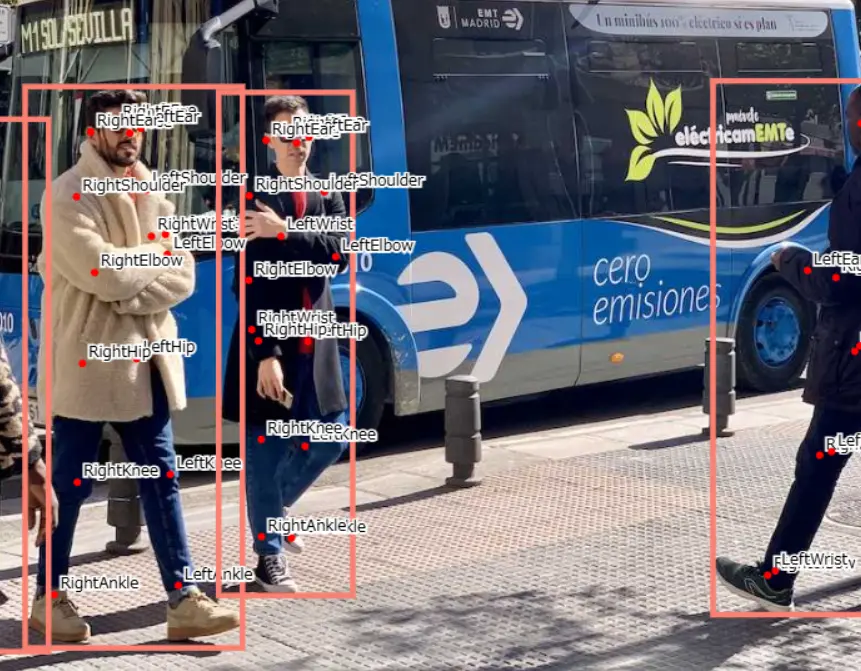
画像内の人物の関節や特徴点の座標を推定したデータが得られます。
モデルの準備
Tensorflow.jsで使える形式のモデルを出力します。
公式のDockerイメージではCUDAを使用しているのかNvidiaのGPUがないとエラーになりました。
Docker Imageの準備
公式のDockerイメージがあるので使用します。
docker pull ultralytics/ultralytics:8.3.90YOLOコンテナの作成
jupyter labを使いたいので8888のポートを開けています。
docker run -it --ipc=host -p 8888:8888 --gpus all --name yolo ultralytics/ultralytics:8.3.90 jupyter labを設定する
コンテナを起動後、open in terminalで以下のコマンドを実行。
pip install jupyterlab
jupyter lab  --allow-root --ip 0.0.0.0
モデルを出力
検出したいモデルをTensorflow.js形式で出力する。検出されたbboxの中にはスコアが閾値以下のbboxや重なっているbboxが大量に含まれています。Non-Maximum Suppressionではそういった不要なデータを削除します。NMSを含んだモデルを出力できるため、nms=Trueを指定します。
検出方法 | モデル名 |
|---|---|
物体検出 | yolo11n.pt |
OBB | yolo11n-obb.pt |
セグメンテーション | yolo11n-seg.pt |
姿勢推定 | yolo11n-pose.pt |
from ultralytics import YOLO

# モデル名(yolo11n.pt, yolo11n-obb.pt, yolo11n-seg.pt)
# 精度のいいモデルを使うときはnを変更
model = YOLO("yolo11n.pt")

model.export(format="tfjs", nms=True)
実行するとmodel.json, metadata.yaml, 分割データが出力されるので圧縮してダウンロードする
!zip -r yolo11n.zip yolo11n_web_modelライブラリのインストール
必要なライブラリをインストールします。
js-yamlはYOLOのmetadata.yamlを解析するの処理に使用します。
npm install @tensorflow/tfjs js-yaml @types/js-yamlモデルとメタデータの読み込み
モデルを読み込みます。読み込みの処理・インターフェイスはすべてのモデルで同一です。まずメタデータのモデルを定義します。
import { load } from "js-yaml";
import { YOLOMetadata } from "./types";

/**
 * モデルの種類
 */
export enum ModelTaskType {
  DETECT = "detect",
  SEGMENT = "segment",
  ORIENTED = "oriented",
  POSE = "pose",
}

/**
 * YOLOのメタデータのデータ型
 */
export interface YOLOMetadata {
  description: string;
  author: string;
  date: string;
  version: string;
  license: string;
  docs: string;
  stride: number;
  task: ModelTaskType;
  batch: number;
  imgsz: [number, number];
  names: { [key: number]: string };
  args: Args;
}

interface Args {
  batch: number;
  half: boolean;
  int8: boolean;
  nms: boolean;
}

/**
 * メタデータを読み込む
 * @param {string} path メタデータのフォルダパス.最後にスラッシュはつけない
 * @returns {YOLOMetadata} メタデータをロードするPromiseを返す
 */
export async function loadMetadata(path: string): Promise<YOLOMetadata | null> {
  let metadata: YOLOMetadata | null = null;
  await fetch(`${path}/metadata.yaml`)
    .then((response) => response.text())
    .then((text) => load(text))
    .then((yamlData) => (metadata = yamlData as YOLOMetadata))
    .catch((error) => console.error("YAML読み込みエラー:", error));
  return metadata;
}
YOLOのモデルを読み込んでウォームアップを実行します。最初の実行に時間がかかるためです。imgszはmetadataから取得した画像のサイズを渡します。metadataで定義されたimgsz以外で推論を実行するとエラーになります。
import "@tensorflow/tfjs-backend-cpu";
import "@tensorflow/tfjs-backend-webgl";

import * as tf from "@tensorflow/tfjs";

/**
 * YOLOのモデルをロードし、初期化を行う
 * @param {string} path モデルが保存されているフォルダパス.最後にスラッシュはつけない
 * @param {[number, number]} imgsz metadataで取得した画像サイズ
 * @returns {Promise<tf.GraphModel<string | tf.io.IOHandler>>} モデルをロードするPromiseを返す
 */
export async function loadYOLOModel(path: string, imgsz: [number, number]): Promise<tf.GraphModel<string | tf.io.IOHandler>> {
  const model = await tf.loadGraphModel(`${path}/model.json`);
  // warm up
  const zeroTensor = tf.zeros([1, imgsz[0], imgsz[1], 3], "float32");
  await model.executeAsync(zeroTensor);
  zeroTensor.dispose();
  return model;
}
画像の準備
画像を推論できるように加工します。
注意点として、画像のサイズはmetadataのimgszと同じあることと、縦横比を変えてしまうと見ている限り精度が落ちることです。
そのため、縦横比を維持したまま入力サイズに合わせます。
のちに表示するときは復元する必要があります。
import * as tf from "@tensorflow/tfjs";

/**
 * ImageElementをimgszのCanvasに変換します。
 * 縦横比を維持したままリサイズし、足りない部分は黒で埋めます。
 * @param {HTMLImageElement | HTMLCanvasElement | HTMLVideoElement} image 変換したい画像の要素
 * @param imgsz YOLOのmetadataで取得した画像サイズ
 * @returns {HTMLCanvasElement} 変換後のCanvas要素
 */
export const convertImageElement = (
  image: HTMLImageElement | HTMLCanvasElement | HTMLVideoElement,
  imgsz: [number, number]
) => {
  const canvas = document.createElement("canvas");
  const context = canvas.getContext("2d");
  if (!context) {
    throw new Error("Canvas context is not available");
  }
  canvas.width = imgsz[0];
  canvas.height = imgsz[1];

  const originalWidth =
    image instanceof HTMLVideoElement ? image.videoWidth : image.width;
  const originalHeight =
    image instanceof HTMLVideoElement ? image.videoHeight : image.height;

  const scale = Math.min(imgsz[0] / originalWidth, imgsz[1] / originalHeight);

  const newWidth = originalWidth * scale;
  const newHeight = originalHeight * scale;

  context.fillStyle = "black";
  context.fillRect(0, 0, imgsz[0], imgsz[1]);

  context.drawImage(image, 0, 0, newWidth, newHeight);

  return canvas;
};

/**
 * ImageElementをTensorに変換します。
 * @param {HTMLImageElement | HTMLCanvasElement | HTMLVideoElement} image 変換したい画像の要素
 * @param imgsz YOLOのmetadataで取得した画像サイズ
 * @returns {tf.Tensor<tf.Rank>} 変換後のTensor
 */
export const tensorFromPixel = (
  image: HTMLImageElement | HTMLCanvasElement | HTMLVideoElement,
  imgsz: [number, number]
): tf.Tensor<tf.Rank> => {
  let imageTensor = tf.browser
    .fromPixels(image)
    .toFloat()
    .div(tf.scalar(255.0));
  imageTensor = imageTensor.resizeBilinear(imgsz);
  return (imageTensor = imageTensor.expandDims(0));
};
物体検出を実行する
モデルと画像の準備ができたので、推論を実行しBBOXを取得します。
tf.tensorを処理したあと破棄しないとメモリリークが発生します。
結果のデータ構造
出力されたデータの構造について、物体検出では出力は以下のように [検出数, bboxデータ]の形式で出力されます。
[
 [x1, y1, x2, y2, score, labelIndex],
 [x1, y1, x2, y2, score, labelIndex],
 [x1, y1, x2, y2, score, labelIndex],
  ...
]
物体検出以外でも上記のデータが基本となり、必要なデータを追加した構造で出力されます。
物体検出を実行
まずは一番簡単な物体検出から。出力されるデータの型は以下のようにしています。
/**
 * 物体検出のバウンディングボックス
 */
export interface DetectBbox {
  x: number;
  y: number;
  w: number;
  h: number;
  label: number;
  score: number;
}
以下のコードのように物体検出を行いデータを上記の型に変換して返します。
import "@tensorflow/tfjs-backend-cpu";
import "@tensorflow/tfjs-backend-webgl";

import * as tf from "@tensorflow/tfjs";
import { convertImageElement, tensorFromPixel } from "./conver_image_element";
import { DetectBbox } from "./types";

/**
 * 物体検出のBBOXに変換する(YOLO v12)
 * @param model
 * @param image
 * @param imgsz
 * @param minScore
 * @returns
 */
export const detect = async (
  model: tf.GraphModel<string | tf.io.IOHandler>,
  image: HTMLImageElement,
  imgsz: [number, number],
  minScore: number,
): Promise<DetectBbox[]> => {
  const convertedCanvas = convertImageElement(image, imgsz);
  const imageTensor = tensorFromPixel(convertedCanvas, imgsz);
  const result = await model.predictAsync(imageTensor) as tf.Tensor2D[];
  const mask = result[0].squeeze().slice([0, 4], [-1, 1]).greater(minScore).squeeze();
  const filteredBbox = await tf.booleanMaskAsync(result[0].squeeze(), mask);
  const bboxes = Object.entries(filteredBbox.arraySync()).map(e => {
    const x1 = e[1][0];
    const y1 = e[1][1];
    const x2 = e[1][2];
    const y2 = e[1][3];
    return {x: x1, y: y1, w: x2 - x1, h: y2 - y1, score: e[1][4], label: e[1][5]} as DetectBbox;
  })
  imageTensor.dispose();
  mask.dispose();
  filteredBbox.dispose();
  result.forEach(e => e.dispose());
  return bboxes;
};
データを表示
BboxとCanvasを渡して表示する処理は以下のページ
https://github.com/yu2728/ObjectDetectionInBrowser/blob/main/src/libs/view/detect.ts
OBBを実行
回転を含むOBBの場合はラジアンが追加され、以下のようになります。
[
 [x1, y1, x2, y2, score, labelIndex, rad],
 [x1, y1, x2, y2, score, labelIndex, rad],
 [x1, y1, x2, y2, score, labelIndex, rad],
  ...
]
そのためデータの型を以下のように定義しています。
/**
 * Oriented Bounding Box
 */
export interface OrientedBbox {
  x: number;
  y: number;
  w: number;
  h: number;
  label: number;
  score: number;
  r: number;
}
以下のコードで推論を実行し、データの変換を行っています。
import "@tensorflow/tfjs-backend-cpu";
import "@tensorflow/tfjs-backend-webgl";

import * as tf from "@tensorflow/tfjs";
import { convertImageElement, tensorFromPixel } from "./conver_image_element";
import { OrientedBbox } from "./types";

/**
 * OrientedBboxに変換する
 * @param model
 * @param image
 * @param imgsz
 * @param minScore
 * @returns
 */
export const obb = async (
  model: tf.GraphModel<string | tf.io.IOHandler>,
  image: HTMLImageElement,
  imgsz: [number, number],
  minScore: number,
  ): Promise<OrientedBbox[]> => {
      const convertedCanvas = convertImageElement(image, imgsz);
      const imageTensor = tensorFromPixel(convertedCanvas, imgsz);
      const result = await model.predictAsync(imageTensor) as tf.Tensor2D[];
      const mask = result[0].squeeze().slice([0, 4], [-1, 1]).greater(minScore).squeeze();
      const filteredBbox = await tf.booleanMaskAsync(result[0].squeeze(), mask);
      const bboxes = Object.entries(filteredBbox.arraySync()).map(e => {
        const cx = e[1][0];
        const cy = e[1][1];
        const w = e[1][2];
        const h = e[1][3];
        const r = e[1][6];
        return {x: cx, y: cy, w: w, h: h, score: e[1][4], label: e[1][5], r: r} as OrientedBbox;
      })
      imageTensor.dispose();
      mask.dispose();
      filteredBbox.dispose();
      result.forEach(e => e.dispose());

    return bboxes;
データを表示する
https://github.com/yu2728/ObjectDetectionInBrowser/blob/main/src/libs/view/oriented.ts
セグメンテーションを実行
/**
 * セグメンテーションのバウンディングボックス
 */
export interface SegBbox {
  x: number;
  y: number;
  w: number;
  h: number;
  label: number;
  score: number;
  mask: number[][];
}
推論して実行する
import "@tensorflow/tfjs-backend-cpu";
import "@tensorflow/tfjs-backend-webgl";

import * as tf from "@tensorflow/tfjs";
import { convertImageElement, tensorFromPixel } from "./conver_image_element";
import { SegBbox } from "./types";

/**
 * SegmentationBBOXに変換する
 * @param model
 * @param image
 * @param imgsz
 * @param minScore
 * @returns
 */
export const seg = async (model: tf.GraphModel<string | tf.io.IOHandler>, image: HTMLImageElement, imgsz: [number, number], minScore: number): Promise<SegBbox[]> => {
  const convertedCanvas = convertImageElement(image, imgsz);
  const imageTensor = tensorFromPixel(convertedCanvas, imgsz);
  const result = (await model.predictAsync(imageTensor)) as tf.Tensor2D[];
  const boxIndexes = result[0].squeeze().slice([0, 4], [-1, 1]).greater(minScore).squeeze();
  const filteredBbox = await tf.booleanMaskAsync(result[0].squeeze(), boxIndexes);

  // get Mask
  // 予測したボックスのマスクを取り出す
  const vectors = filteredBbox.slice([0, 6], [-1, -1]);
  // 画像を一つの配列に変換
  const maskWeight = result[2].squeeze().reshape([160 * 160, 32]);
  // 変換
  const transponsedVectors = vectors.transpose([1, 0]);
  // マスクの重みとベクトルの内積を取る
  const dotProduct = tf.matMul(maskWeight, transponsedVectors);
  // シグモイド関数で0から1の範囲に変換
  const probabiltyMap = dotProduct.sigmoid();
  // minScore以上の確率を1、それ以外を0とする
  const binaryMask = probabiltyMap.greater(minScore);
  const masks = binaryMask.transpose([1, 0]).reshape([filteredBbox.shape[0], 160, 160]).arraySync() as [];
  const bboxes = Object.entries(filteredBbox.arraySync()).map((e, index) => {
    const x1 = e[1][0];
    const y1 = e[1][1];
    const x2 = e[1][2];
    const y2 = e[1][3];
    return { x: x1, y: y1, w: x2 - x1, h: y2 - y1, score: e[1][4], label: e[1][5], mask: masks[index] } as SegBbox;
  });
  imageTensor.dispose();
  filteredBbox.dispose();
  result.forEach((e) => e.dispose());
  return bboxes;
};
各ラベルのマスクとプロトタイプマスクを合成することで最終的なマスクデータを取得できます。各ラベルのマスクはresult[0]で出力されプロトタイプマスクはresult[2]で出力されています。
以下のissueを参考にしましたが、正直よくわかっていないです。実際に表示するとうまく動いていそうです
https://github.com/ultralytics/ultralytics/issues/2953
データの表示
https://github.com/yu2728/ObjectDetectionInBrowser/blob/main/src/libs/view/seg.ts
姿勢推定を実行
公式ページを確認したところ以下のように17個のキーポイントの推定情報が取得できるようです。
/**
 * POSE Bounding Box
 */
export interface PoseBbox {
  x: number;
  y: number;
  w: number;
  h: number;
  label: number;
  score: number;
  r: number;
  keypoints: PoseKeypoint[];
}

/**
 * https://docs.ultralytics.com/ja/tasks/pose/
 * 上記のURLから
 * 0 鼻
 * 1 左目
 * 2 右目
 * 3 左耳
 * 4 右耳
 * 5 左肩
 * 6 右肩
 * 7 左肘
 * 8 右肘
 * 9 左手首
 * 10 右手首
 * 11 左ヒップ
 * 12 右ヒップ
 * 13 左膝
 * 14 右膝
 * 15 左足首
 * 16 右足首
 */
export enum Keypoint {
  Nose,
  LeftEye,
  RightEye,
  LeftEar,
  RightEar,
  LeftShoulder,
  RightShoulder,
  LeftElbow,
  RightElbow,
  LeftWrist,
  RightWrist,
  LeftHip,
  RightHip,
  LeftKnee,
  RightKnee,
  LeftAnkle,
  RightAnkle
}

export interface PoseKeypoint{
  x: number;
  y: number;
  score: number;
  keypoint: Keypoint
}
ポーズの出力結果は[1, 300, 57]になります。1つの画像の中で300の物体を検知し、その物体の位置や姿勢の情報などを57の値があります。
はじめの6個の値が検出した人物の全体の情報になります。その後、各キーポイントの座標とスコアが並びます。基本の6個の値と17*3の51の値を合わせて57の値が取得できます。
[
   [x, y, w, h, score, label, nose_x, nose_y, nose_score, lefteye_x, lefteye_y, lefteye_score, ....],
   [x, y, w, h, score, label, nose_x, nose_y, nose_score, lefteye_x, lefteye_y, lefteye_score, ....],
   [x, y, w, h, score, label, nose_x, nose_y, nose_score, lefteye_x, lefteye_y, lefteye_score, ....],
   ...
]
以下のコードが推論を実行してデータを変換している処理です。閾値を下回ったキーポイントは追加しません。
import "@tensorflow/tfjs-backend-cpu";
import "@tensorflow/tfjs-backend-webgl";

import * as tf from "@tensorflow/tfjs";
import { convertImageElement, tensorFromPixel } from "./conver_image_element";
import { DetectBbox, PoseBbox, PoseKeypoint } from "./types";

/**
 * POSEのBBOXに変換する
 * @param model
 * @param image
 * @param imgsz
 * @param minScore
 * @returns
 */
export const pose = async (model: tf.GraphModel<string | tf.io.IOHandler>, image: HTMLImageElement, imgsz: [number, number], minScore: number): Promise<PoseBbox[]> => {
  const convertedCanvas = convertImageElement(image, imgsz);
  const imageTensor = tensorFromPixel(convertedCanvas, imgsz);
  const result = (await model.predictAsync(imageTensor)) as tf.Tensor2D[];
  const mask = result[0].squeeze().slice([0, 4], [-1, 1]).greater(minScore).squeeze();
  const filteredBbox = await tf.booleanMaskAsync(result[0].squeeze(), mask);
  const bboxes = Object.entries(filteredBbox.arraySync()).map((e) => {
    const x1 = e[1][0];
    const y1 = e[1][1];
    const x2 = e[1][2];
    const y2 = e[1][3];
    const keypoints: PoseKeypoint[] = [];
    let keypointIndex = 0;

    for (let i = 6; i < Object.entries(e[1]).length; i += 3) {
      if (e[1][i + 2] < minScore) {
        continue;
      }
      keypoints.push({ x: e[1][i], y: e[1][i + 1], score: e[1][i + 2], keypoint: keypointIndex } as PoseKeypoint);
      keypointIndex++;
    }
    return { x: x1, y: y1, w: x2 - x1, h: y2 - y1, score: e[1][4], label: e[1][5], keypoints: keypoints } as PoseBbox;
  });

  imageTensor.dispose();
  mask.dispose();
  filteredBbox.dispose();
  result.forEach((e) => e.dispose());
  return bboxes;
};
ポーズのデータを表示するコード
https://github.com/yu2728/ObjectDetectionInBrowser/blob/main/src/libs/view/pose.ts
実行するコード
  async function predict() {
    if (!imageRef.current || !metadata || !model) {
      return;
    }
    const restoreScale = Math.max(imageRef.current!.width / metadata!.imgsz[0], imageRef.current!.height / metadata!.imgsz[1]);
    switch (selectedModelType) {
      case ModelTaskType.DETECT: {
        const bboxes = await detect(model, imageRef.current, metadata.imgsz, 0.4);
        detectView(canvasRef.current!, imageRef.current!, restoreScale, bboxes as DetectBbox[]);
        break;
      }
      case ModelTaskType.ORIENTED: {
        const bboxes = await obb(model, imageRef.current, metadata.imgsz, 0.4);
        orientedView(canvasRef.current!, imageRef.current!, restoreScale, bboxes as OrientedBbox[]);
        break;
      }
      case ModelTaskType.SEGMENT: {
        const bboxes = await seg(model, imageRef.current, metadata.imgsz, 0.4);
        segmentView(canvasRef.current!, maskCanvasRef.current!, imageRef.current!, metadata!.imgsz, bboxes as SegBbox[]);
        break;
      }
      case ModelTaskType.V12_DETECT: {
        const bboxes = await detectV12(model, imageRef.current, metadata.imgsz, 0.4);
        detectView(canvasRef.current!, imageRef.current!, restoreScale, bboxes);
        break;
      }
    }
  }
おわりに
NMSが含まれるモデルを準備することでだいぶ楽になりました。
